반응형
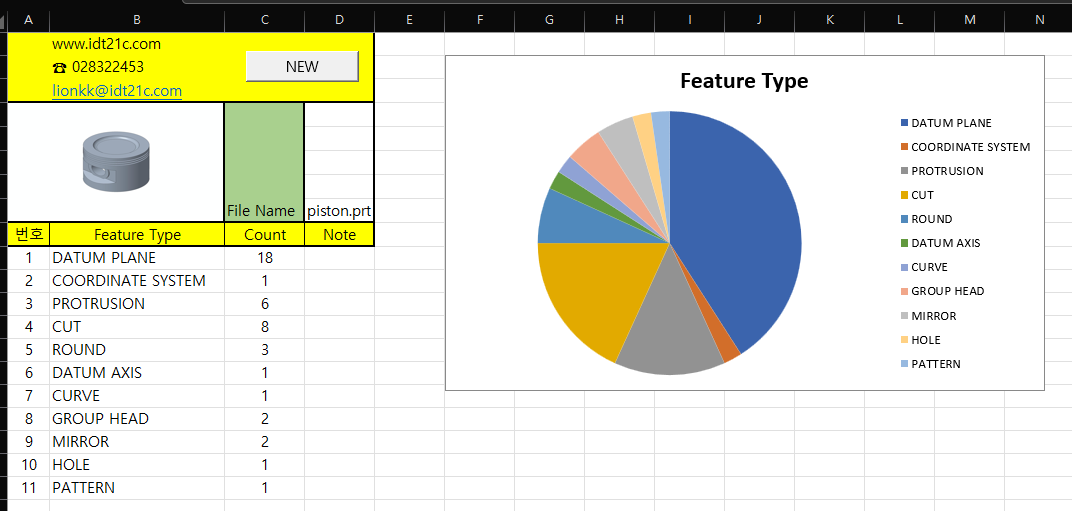
Creo Part의 Feature 타입을 엑셀 차트 기능을 이용하여, 시각화 합니다.
Creo Part 모델에서 Parameter 값을 이용 하여 시각화 할 수 있습니다.
| Creo Model | Excel |
 |
 |
Program Download
여러개의 sub (코드)를 이용합니다. 사용자 화면은 아래와 같습니다

1. Creo Session 연결 Code 입니다. 전역 변수를 정의 합니다
Option Explicit
Public asynconn As New pfcls.CCpfcAsyncConnection
Public conn As pfcls.IpfcAsyncConnection
Public oSession As pfcls.IpfcBaseSession
Public oModel As IpfcModel
Public oSolid As IpfcSolid
Public Sub Creo_Connect()

    Application.EnableEvents = False

    '//////////////////////////////////////////////////////////////////////////////////////////////////////
    '// Creo Connect Check
    '//////////////////////////////////////////////////////////////////////////////////////////////////////
    On Error Resume Next
    Set conn = asynconn.Connect("", "", ".", 5)

        If conn Is Nothing Then

           MsgBox "Error occurred while starting new Creo Parametric Session!", vbInformation, "www.idt21c.com"
           Exit Sub

        End If
     '//////////////////////////////////////////////////////////////////////////////////////////////////////

    Set oSession = conn.Session

    '// Current Model
    Set oModel = oSession.CurrentModel
    Set oSolid = oModel

End Sub
2. Main Code
Part 파일이 가지고 있는 Feature 모두 Range "Z10" 아래에 표시 합니다. 프로그램이 자동으로 삭제 합니다
Sub FeatureTypeCount()

    Call Creo_Connect

    Cells(8, "d") = oModel.Filename

    '// Creo Parameter variable

    Dim oModelowner As IpfcModelItemOwner
    Set oModelowner = oModel
    Dim oModelitems As IpfcModelItems
    Set oModelitems = oModelowner.ListItems(EpfcModelItemType.EpfcITEM_FEATURE)

    Dim i As Integer
    Dim oModelItem As IpfcModelItem
    Dim oFeature As IpfcFeature

    For i = 0 To oModelitems.Count - 1

        Set oFeature = oModelitems.Item(i)

        Cells(i + 10, "Z") = oFeature.FeatTypeName

    Next i

    Call Duplicate_01

    Call AddChart

    Call Jpg_export

    MsgBox "Feature Analysis Is Complete !", vbInformation, "www.idt21c.com"

End Sub
3. 중복 파일 제거 및 수량 카운드
Sub Duplicate_01()

    Dim rng As Range, C As Range
    Dim dc As New Collection
    Set rng = Range("Z10", Cells(Rows.Count, "Z").End(xlUp))

    Dim i As Integer

On Error Resume Next

    For Each C In rng
        If Len(C) Then
            dc.Add Trim(C), CStr(Trim(C))
        End If
    Next

    For i = 1 To dc.Count

        Cells(i + 9, "B") = dc(i) '// Feature Name

    Next i

    For i = 1 To dc.Count

        Cells(i + 9, "C") = WorksheetFunction.CountIf(rng, dc(i)) '//  Duplicate Feature Count
        Cells(i + 9, "A") = i

    Next i

Columns("Z").Delete
End Sub
4. Chart 만들기
Sub AddChart()

    '// chart delete
     If ActiveSheet.ChartObjects.Count > 0 Then

        ActiveSheet.ChartObjects.Delete

     End If

     Dim rng As Range
     Dim rn As Integer
     Set rng = Worksheets("File InfoII").Range("C10", Cells(Rows.Count, "C").End(xlUp))
     rn = rng.Rows.Count

     Dim cht As ChartObject

     '// data range for the chart
     Set rng = ActiveSheet.Range(Cells(10, "B"), Cells(rn + 9, "C"))


     '// Create a chart
     Set cht = ActiveSheet.ChartObjects.Add(Left:=Cells(2, "F").Left, Width:=450, Top:=Cells(2, "F").Top, Height:=250)


     With cht
        .Chart.SetSourceData Source:=rng
        .Chart.ChartType = xlPie
        .Chart.HasTitle = True  '// Ensure chart has a title
        .Chart.ChartTitle.Text = "Feature Type" '// 'Change chart's title
        .Name = "Type01"

     End With


End Sub
5. 이미지 만들기
Sub Jpg_export()

    '// Back Ground Color White
    Dim BackgroundWhitemacro As String
    BackgroundWhitemacro = "al_screen_cap @MAPKEY_LABEL스크린 샷을 찍기위해서 흰배경으로 변경;\mapkey(continued) ~ Select `main_dlg_cur` `appl_casc`;~ Close `main_dlg_cur` `appl_casc`;\mapkey(continued) ~ Command `ProCmdRibbonOptionsDlg` ;\mapkey(continued) ~ Select `ribbon_options_dialog` `PageSwitcherPageList` 1 `colors_layouts`;\mapkey(continued) ~ Open `ribbon_options_dialog` `colors_layouts.Color_scheme_optMenu`;\mapkey(continued) ~ Close `ribbon_options_dialog` `colors_layouts.Color_scheme_optMenu`;\mapkey(continued) ~ Select `ribbon_options_dialog` `colors_layouts.Color_scheme_optMenu` 1 `2`;\mapkey(continued) ~ Activate `ribbon_options_dialog` `OkPshBtn`;\mapkey(continued) ~ Command `ProCmdViewSpinCntr`  0;nCntr`  0;"
    oSession.RunMacro (BackgroundWhitemacro)

    '// config.pro
    Call oSession.SetConfigOption("display_planes", "no")
    Call oSession.SetConfigOption("display_axes", "no")
    Call oSession.SetConfigOption("display_coord_sys", "no")
    Call oSession.SetConfigOption("display_points", "no")
    Call oSession.SetConfigOption("display_annotations", "no")
    Call oSession.SetConfigOption("display", "shadewithedges")


    '// sheet scale
    ActiveWindow.Zoom = 100
    Application.ScreenUpdating = True


    '// jpg 변환 옵션변수 정의
    Dim rasterHeight As Double: rasterHeight = 22
    Dim rasterWidth As Double: rasterWidth = 17

    Dim JPEGImageExportCreate As New CCpfcJPEGImageExportInstructions
    Dim oJPEGExport As IpfcJPEGImageExportInstructions
    Set oJPEGExport = JPEGImageExportCreate.Create(rasterHeight, rasterWidth)
    Dim instructions As IpfcRasterImageExportInstructions
    Set instructions = oJPEGExport

    instructions.DotsPerInch = EpfcDotsPerInch.EpfcRASTERDPI_100
    instructions.ImageDepth = EpfcRasterDepth.EpfcRASTERDEPTH_8

    Dim oViewOwner As IpfcViewOwner
    Set oViewOwner = oSession.CurrentModel
    Dim oIpfcView As IpfcView
    Set oIpfcView = oViewOwner.RetrieveView("ISOVIEW")

    If oIpfcView Is Nothing Then

            Set oIpfcView = oViewOwner.RetrieveView("default")

    End If

    Dim oJpgfilename As String: oJpgfilename = oModel.FullName & ".JPG"

    '// jpg image location
    Dim oWorkfolder As String
    oWorkfolder = Worksheets("data").Cells(17, "B")

    oSession.ChangeDirectory (oWorkfolder)

    '// jpg image 변환 실행
    Dim oWindow As IpfcWindow
    Set oWindow = oSession.CurrentWindow
    Call oWindow.ExportRasterImage(oJpgfilename, instructions)

    oSession.ChangeDirectory (Worksheets("File Info").Cells(4, "E"))


    '// jpg image Insert

     Dim str2 As String, ret As String
     Dim Pic As Picture
     Dim Imagecell As Range


     str2 = oWorkfolder & "\" & oJpgfilename
     ret = Dir(str2)

     If ret <> "" Then
            Set Pic = Worksheets("File InfoII").Pictures.Insert(str2)
            Set Imagecell = Range("A4:B8")

            Range("A4:B8").RowHeight = 18

            With Pic
                .ShapeRange.LockAspectRatio = msoFalse
                .Left = Imagecell.Left + 1
                .Top = Imagecell.Top + 1
                .Width = Imagecell.Width - 4
                .Height = Imagecell.Height - 4
            End With

      End If

End Sub
■ 동영상
반응형
'업무 자동화 > VBA, VB.NET For Creo' 카테고리의 다른 글
| 도면이 가지고 있는 치수 값을 가지고 오기 #1 (0) | 2023.02.14 |
|---|---|
| 모델이 가지고 있는 치수 값을 가지고 오기 - 두번째 (0) | 2023.02.11 |
| Get the parameter value in the feature (0) | 2023.02.08 |
| 함께 VBA 만들기 #7 - Creo 3D 모델 정보 보기 프로그램 사용 방법 (0) | 2023.02.08 |
| 함께 VBA 만들기 #6 - Parameter 값 모델에 저장하기 (0) | 2023.02.08 |


